Growing with the Aerogarden
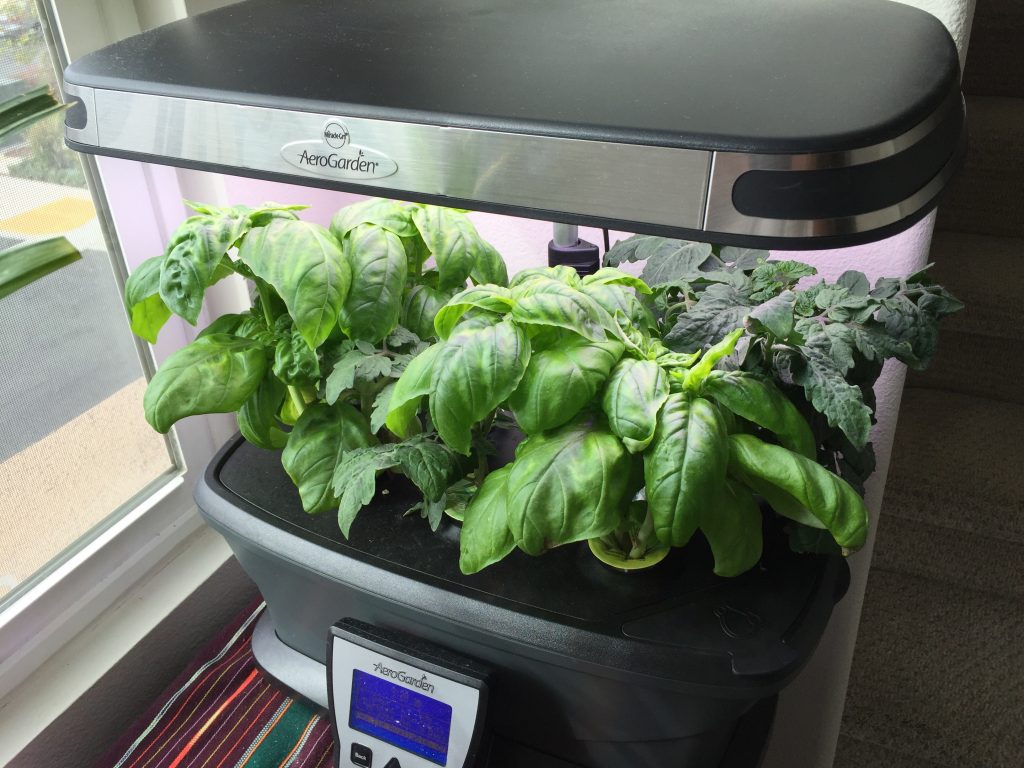
This is my Aerogarden Ultra LED. I’ve had it for about 1.5 years now. In the picture above, there are 2 basil plants in the front with a tomato in between and two tomato plants in the back.
The Aerogarden system is as easy as it gets growing plants hydroponically. Hydroponics means that you are growing plants in water instead of dirt.
In my experience, the Aerogarden works very well. I haven’t had any issues with diseases or pests since using it indoors. However, the Aerogarden does get messy. Especially as the plants get bigger and reach maturity. You have to keep raising the LED lights higher and higher. As you do that the leaves below don’t get enough light and eventually will die off if you do not harvest them.
In terms of quality of the herbs I would give it a 10/10- dill, Thai basil, Italian sweet basil, parsley and mint have grown really well. I could not get the chives to start and the cilantro never worked well either. But I’m willing to give them another try.
The dwarf tomato plants did okay. The flavor was good, however, compared to tomatoes grown in the dirt outside, I would say not as good. The flavor didn’t seem as strong and sweetness was just lacking. It could also be a result of the type of tomato. Maybe my expectations were too high? So maybe a 7/10 for tomatoes. I haven’t tried peppers yet, but was going to give Thai peppers a try.
If you are looking at trying out the Aerogarden or are curious about hydroponics, I would recommend this device. It is an easy way to always have fresh herbs on hand. And if you are an avid cook like me there is nothing better than picking herbs right before using them in your food!!
Overall, the pros of the Aerogarden Ultra with LED are that its very low maintenance. You have less risk of bug infestations (e.g. spider mites, aphids, caterpillars, scale insects etc) and it also grows your plants faster than in dirt (20-30% faster). All you have to do is feed and water about on a weekly basis and more frequently as the plants grow bigger. (More leaves equals more water being evaporated.)
The cons would include the light source only comes from the top of the device, so lower parts of the plant may die off. Also, the light is on about 18 hours per day for herbs, maybe less for vegetables and it is bright. So you would want to consider placement for a light that is on all the time. If you are going to be away for more than a week, you will need someone to fill up the reservoir so the plants don’t die of thirst!
Aerogarden Tips
If you already have one of these and continue to plan using it, there are a few ideas I would consider for future grows.
- One would be to buy the little peat replacement packs (50 pack) and planting your own seeds in them. They are essentially the same things your original Miracle Gro seeds came in. The only difference is they have no seeds. All you need to do is save the white plastic frames, discard the old sponges and insert the new ones for your next grow. This is very easy to do and saves you a lot of money in the long run, since the name brand seed packs are expensive.
- Make sure to save the plastic domes so you can make your own sponges for future grows!!
- Likewise, the official Miracle Gro Brand food is pretty expensive as well. For the food you can also use an alternative nutrient mix. I can tell you that my experiences with an alternative nutrient mix have been as good if not better than the Miracle Gro Brand. I have used these two plant nutrient mixes Maxigro and Maxibloom with good results for my herbs and tomato plants.
- However, I’d like to caveat that you will need to make sure to watch the pH as I have found them to make the solution pH very low, which is not good. I don’t check too often, maybe 1-2 times per month. But if it gets way too acidic or basic it could prevent your plants from getting the nutrients they need.
- For checking the pH I would recommend this pH testing kit and refill solution which is very easy to use. This really isn’t a requirement, but it could help you diagnosis issues should you have any.
- Keep the light as close to the top of the plants as possible. The further away the light is, the less light reaches the plants and also at a lower intensity. Less light and less intensity is decreased efficiency. If you see the leaves hitting the light and there is condensation, might be time to raise the lights a little bit.
- Prune regularly to keep your plants healthy and bushy. Especially for herbs!!
Check out more recent Aerogarden Ultra LED grows here and here – on my gardening page
You can find the above products as well as the Aerogarden on Amazon, where I got mine – Aerogarden Ultra with LED
In conclusion, I was initially a bit skeptical about how this device would do growing plants. But after using it for over a year, I am very happy with it.
If you liked this post, please share or leave a comment. Thanks for reading!


Konnichiwa! (Hello!) I'm Pat Tokuyama, a Japanese tofu cookbook author, who travels for music, food, and adventure. If you like Japanese tea, checkout some of the newestorganic japanese tea, matcha bowls and noren and more!
** Curious about the Plant Based Japanese Cooking Club? ** Learn more here!